Bacon and Games

Tag: as3 (page 2 of 3)

Adam Atomic on Tuning Canabalt

Yesterday on the Semi Secret dev blog, Adam Atomic posted an article entitled Tuning Canabalt. In the article he reveals some of the tweaks, tricks and techniques that went into getting the gameplay of Canabalt just right. From a game design standpoint, this is probably the most interesting article I’ve read in a long time.

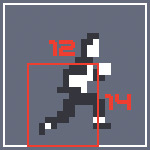
Adam goes into how he chose the aspect ratio for this game, which is an interesting story about portraying speed in a 2D environment. He also discusses his technique for auto-generating playable levels based on the user’s current speed. There are lots of interesting topics in this article, however I felt the big takeaway was his discussion about providing “a little extra cushioning for people’s reaction times”. In Canabalt, what the “game engine sees” is not always a 1:1 to what the user sees. Adam talks about how me modified the hitboxes of the player, buildings and obstacles to make them a bit more forgiving for the user.

When you’re making a game like Canabalt, the idea is to make the player feel like a superhero. It’s OK if you have to lie a little bit, or in the case of Canabalt fudge the hit areas, to achieve this. As long as the programming layer and visual layer aren’t grotesquely different, the user won’t notice the tricks you’ve pulled… particularly when the tricks are in their favor. No-one questions how they survived a jump, but they will argue a death they felt was undue.

In the game below the hit areas are much smaller than the actual robots so that the user could zip in and out of them. This allowed the hero to move more adeptly which makes the user feel like Indiana Jones narrowly sliding under that closing temple door.

In order to build a fast paced game, Adam had to find ways to give back to the users the reaction time game environment’s limitations cost them. His explanation of how he did this is very interesting.

Tuning Canabalt is a must read for anyone who makes games, but it might be equally interesting to someone who just likes to play them.

How to Simplify Programming Challenges

I recently had a young programmer named Jack (that’s not his butt to the right) ask me for help with a game he’s been working on. I don’t want to give away too much about his unreleased game, but for the sake of discussion I have to at least tell you that it involves a big ass rock that goes around smashing the crap out of different shit. (and 2 sentences in I’ve hit my butt reference limit for this article)

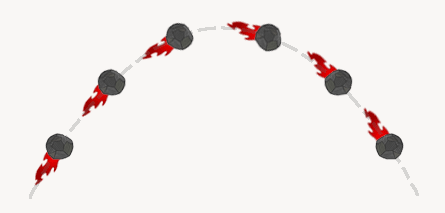
The version he shared with me was pretty far along but he was stuck on one particular detail; getting the rock’s tail to point in the proper direction. Essentially he wanted the tail to point away from the direction the rock was moving, similar to the tail a roll of toilet paper might draw when thrown through the air.

This is a fairly common challenge in game programming and I, like many other game programmers, have done this in the past. I have code that I would have happily handed over to him, but after speaking to him we decided it would be more valuable for me to push him in the right direction rather than just take his FLA and fill in the blanks. I’ll spare you the Chinese proverb about teaching a man to fish..

On Problem Solving
Whether you’re programming super complicated banking software or just making a simple number guessing game, the process is the same.

  1. What do you need to do? Define the challenge.
  2. What do you know? Assess the tools and info you have at your disposal.
  3. Do you have all the pieces? Figure out if what you have can be used to solve the problem.
  4. If yes: Create a plan for using what you have in order to solve the problem.
  5. If no: Break the problem into smaller challenges and return to step 1

This is of course a grotesquely generalized version of problem solving. But what’s important to note is that by asking the right questions you can distill ANY problem into simpler more manageable parts. No matter how complex, the solution to all programming challenges (and most real life ones too!) is simply the sum of smaller problems solved in the right order.

Asking the Right Questions
Let’s take a look at Jack’s problem and how we might break it down into a solution.
1. What do you need to do?
We need to rotate the rock so that it’s “facing” the direction it’s moving.

This is a “plain English” definition of the problem, which is the best place to start, but before we can continue we’ll need to convert the definition of our problem into something we can quantify.

Since movieClips have a rotation (_rotation in AS2) property, it’s likely that we’re going to need to use this to point the clip in the right direction. We know that the rotation property accepts degrees, so we’re probably looking for an angle.

The real answer to Question #1 is:
“We need to figure out the angle at which the rock is moving.”

2. What do you know?
In this step you’ll want to keep the answer to Question #1 in mind, but it’s perfectly fine to be liberal about listing the things you know. You can sort out the relevant data from the irrelevant later, but you never know what piece of information might spark an idea so to start it’s a good idea to list whatever comes to mind. (be creative!)

  • Since the rock is a movieClip we have access to all of its properties; rotation, x, y, etc. These 3 are the most likely to be useful, but remember movieClips have all sorts of properties.
  • It’s moving so we probably know its speed in the x and y directions
  • Our rock might be in an environment with some rules, such as gravity, windspeed and friction. It’s our world, so we’d know all these things too.
  • We also probably know who shot Mr. Burns. Who doesn’t? But I can’t imagine that’s going to do us any good.

3. Do you have all the pieces?
Now that we’ve listed the stuff we know, we have to sift through it for something that might help us calculate an angle.

If we can define a line, we can calculate an angle. Well, a line is defined by two points so let’s look at what we collected in Question #2 and see if we can come up with two points; two points that define the path of our rock.

We have the current location of the rock, via the x and y properties of the movieClip, which would be the end point of our line. We need the starting point to complete the line, which we don’t have in our list.

This means that the answer to Question #3 is “No”. We have to put this part of the problem on hold for now and refine our problem into a more specific question:

Where can we get the starting point so that we can draw a line?

Luckily for us this is an extremely simple problem. On every frame we’re going to be updating the position of the rock. So all we have to do is store the current position of the rock before we move to the next frame. (I recommend a variable called lastPosition)

If we do that, we can add lastPosition to the list of things we know, which gives us two points. We’ve got our line! This means we can calculate an angle, which means we can figure out what angle we need in order to point the rock in the right direction. We’re almost done!

The next thing we need to do is write a function into which we can pass our starting and ending points that will give us an angle in return. Since this isn’t a math lesson, it’s a lesson about learning to fish (OK I lied about the proverb), I’ll just write the function for you. They’re adapted from one of my favorite books, Keith Peters’ Foundation Actionscript 3.0 Animation: Making Things Move! (I’m also a big fan of this book) Both are fantastic resources for math, physics and other common game programming stuff.

1
2
3
4
5
6
7
8
9
10
11
12
13
14
15
// AS2
function getAngle(startX,startY,endX,endY):Number{
	var dx:Number = endX - startX;
	var dy:Number = endY - startY;
	var radians:Number = Math.atan2(dy,dx);
	return radians*180/Math.PI;
}
 
// AS3 
function getAngle(st:Point,end:Point):Number{
	var dx:Number = end.x-st.x;
	var dy:Number = end.y-st.y;
	var radians:Number = Math.atan2(dy,dx);
	return radians*180/Math.PI;
}

The last thing for us to consider is how to setup the rock clip. If we set it up so it’s facing to the right in its default position [rotation=0], the angle we get back from our function will point the rock in the correct direction.

There you have it, a seemingly complex problem broken down into a few manageable parts.

This problem was small, but the process is applicable to a project of any size and challenges of any complexity. The key is accurately defining the things you need to achieve. From there you can survey what you have at your disposal and see if what you have can be used to get what you need. If you can’t, you need to define more specific questions until you have all the tools and info you need to finish the job. It’s just that simple.

Now go, build the next Farmville or twitter or Google Wave, you know…something really useful. Oh, one more thing, bedonkedonk… I lied about the butt thing too ;)

Thanks to Ajay Karat for lending me his rock and fire art for the trajectory sample above.
Quickly Demo MovieClips with the MCStepper Class

Some of the goals I have for this site include demystifying Actionscript for the artists out there who are struggling to learn it. Most of the tutorials out there are aimed at programmers and don’t speak to artists, many of whom have learned just enough to get by and don’t understand the concepts of classes, events, instances, scope and other programming wizardry.

With respect to building games, it’s also a goal of mine to help artists and programmers work together more easily. One way to do this is to help give artists a better understanding of how programmers use their art and animation. Understanding the context of the work you’re doing is key to collaborating with someone who is doing the other half of your work. Another way to help programmers and artists work more efficiently is to create tools to aid the development process, which is what I’ll be doing in this article.

Artists often need to demo character designs and other layouts or animations through the course of a project. I’ve seen them struggle to build PowerPoint-esque demos so others can review their work, usually by copying and pasting next and back buttons from a previous project. Hardcoding, typos and other needless errors can steal valuable time while the artist tries to figure out why their next and back buttons aren’t behaving as they expected. There must be an easier way ;)

I’ve built a very simple MCStepper class that will allow you to create demos of a movieClips very quickly. Simply create an instance of the class then pass it the instance name of a movieClip. Next and back buttons will be automatically generated for you. The user can then flip through the frames of the movieClip. One line of code and you can easily demo your character designs and animations. Here’s a few examples of what it looks like.

This movie requires Flash Player 9

The class is meant to be a quick utility for demonstrating work, though there are a few “features”

  • Buttons are automatically generated for you. However you can choose to have them displayed above, beside or below your movieClip.
  • You can change the color of the buttons so that they stand out against the background of your movie.
  • A frame counter will be auto-generated as well, so the user knows how many frames are in your movieClip. This textField will be hidden if there isn’t enough room between the buttons or if you opt to have them beside your movieClip, rather than above or below it.
  • If you define frame labels, they will be displayed as tooltip rollovers when the user hovers over the movieClip. This feature was included as a quick and dirty way to add basic info like “hero #1” or “main boss” to your demo, for reference purposes. Be aware that these can run off the right of your movie…

Besides the insert statement to include the class, you only need one line of code to create each of the above examples.

1
2
3
4
5
6
7
8
9
10
// create blue buttons above the movieClip "dude0"
var stepper0:MCStepper = new MCStepper(dude0,"top",0x255396);
// create red buttons on either side of movieClip "dude1"
var stepper1:MCStepper = new MCStepper(dude1,"sides",0xff0000);
// create default buttons for movieClip "dude2", below and black
var stepper2:MCStepper = new MCStepper(dude2);
// to change the color of the button but keep them below the movieClip,
// use "below" as the second argument
// besides omitting frame labels, you can suppress the tooltip by
// setting the showLabels to false. ex: stepper1.showLabels = false;

As I intend to do with all my Actionscript for Artists articles, I will include 2 sample implementations. The first a pure actionscript example, showing the way a programmer would likely use this class. The second is an approach that an artist, more likely to do most of the setup in the Flash IDE, would be more comfortable.

For Programmers: Download the pure actionscript demo and files here.
For Artists: Download the “artists” demo and files here. – you will want to put the baconandgames folder in the same folder as your fla

Note: These sample files are in CS4. The MCStepper class will work with older versions but will throw a reference error if published for Flash Player 9 or earlier due to ghd MCStepper’s use of the currentFrameLabel property.

I encourage artists to spend some time with both implementations and see if they can make sense of the pure actionscript approach. Here’s a tip to get you started. The Document class, in this case Main.as (defined in the Property Inspector), is run immediately after the swf loads, as if it was code written on frame 1 of the main timeline. If you can understand that, the implementation is the same as the timeline version. You just have to sort out what’s setup (attaching and positioning visual assets) and what part handles the MCStepper functionality.

Whether you take the pure actionscript approach, using external .as files or follow the IDE-reliant timeline approach, I hope people will find this class useful in future collaborations. If you have questions or find bugs, please leave comments and I will follow up. Fun Fact: The art in this demo is from a little side project I’m working on with some friends, so stay tuned :)

Learn How to Make Flash Games

If you’re looking to learn how to make a Flash game, Adam ‘Atomic’ Saltsman and Chevy Ray Johnston are coming to your rescue. They’ve recently launched a joint venture, Flash Game Dojo, which is a site dedicated to helping ease people into the world of creating Flash games. Their site aims to answer questions like “How do I add gravity to an object?”, “How do I get keyboard input?” and “Who shot Mr. Burns?”. OK, I made that last one up, plus we all know that it was Maggie. Anyway… Granted the information they’re providing is specific to using their respective frameworks, but a lot of the key concepts and programming models you’ll learn working with Flixel and FlashPunk are still relevant when building a game completely from scratch. And they’re open source frameworks, so if you’re uncomfortable using formulas without deriving them first (remember high school math?), you can open up the guts and see what’s going on under the hood of something as eerily simple as this:

1
2
3
// adding gravity to the player
var player:FlxSprite = new FlxSprite();
player.acceleration.y = 600;

What’s really neat about what Adam and Chevy are doing is that they’re aiming to usher people into the world of creating games. They’re NOT trying to push their respective frameworks, which as products in a marketplace would be competitors. Instead they’ve chosen to offer their work up as free open source options, a space in which they can support each other rather than compete. They’re working together toward a common goal: Get people making great games. I applaud them for that.

I have an upcoming series of articles entitled “Actionscript for Artists” which will focus on providing tools to help artists and programmers work more easily together to make games. It’ll be a mix of code samples, tutorials aimed at teaching artists the basics of Actionscript and tips on how to communicate and collaborate. I come from a more traditional Flash gaming background that uses vector art, movieClips and other techniques more native to Flash, so my focus will be on that style of Flash game development. Flixel and FlashPunk are Flash frameworks that turn Flash into an environment similar to the way old NES games were built, using sprite sheets and raster images. Though our approaches to Flash game development are different, we’re all trying to do the same thing: get people making great games. And besides, variety is a good thing. I’ve only dabbled in Flixel and though it’s a very foreign approach for me (I’m used to building everything on my own, so adhering to a framework is tough for me to get used to) I intend to learn Flixel and FlashPunk. I don’t think I’ll ever abandon the way I’ve always made Flash games, but I do like to try new things, evolve and add new things to my bag of tricks.

Flash Dojo offers a bunch of handy services:

  • A wiki with documentation on both frameworks
  • Q&A style explanations for how to build common game elements
  • Free swf hosting for people who want to quickly test and share a game… likely to be used by people who want to share a work in progress that isn’t ready to go on Newgrounds. You upload a swf and the site gives you a link to share it. It’s that simple. I’ve got webspace coming out of my ears but this is so simple I will undoubtedly use it from time to tim.
  • Articles about game design
  • Software recommendations
  • Tutorials
  • Completed game source for your learning/tinkering pleasure
  • And the bulk of their site’s updates are broadcast via RSS so you can stay abreast of what’s new

If you’re interested in game design I strongly recommend you comb through Flash Game Dojo. Spend some time playing with their frameworks, see what they can do and how they work. But remember that Adam and Chevy don’t have all the answers and they haven’t thought of everything. They will be the first to tell you that their framworks aren’t the ways to build games, they’re just two ways to build games. Learn from what they’ve done, add your own flair and if you think you have found a better way to do something you may well have. I’m sure Adam and Chevy are interested in being the starting point from which people can learn how to make games. What they’re probably NOT interested in is creating a legion of game designers who rely so heavily on Flixel or FlashPunk that the frameworks speak louder than the game experiences created with them. The idea is for people to play your game and remark, “That’s a great game!”, rather than “That’s a great Flixel game!”.

Create. Learn. Play. Question. Invent. Share.

Adam is known for games such as Gravity Hook and Canabalt which he built using the Flixel Framework, for which he is also responsible. Chevy Ray Johnston is behind Flash Punk, another Flash game framework. Both frameworks are designed to handle a lot of the heavy lifting, collision detections, ui, asset management, etc., so that you can focus on game design.

Calculating the Distance from a Point to a Line in AS3

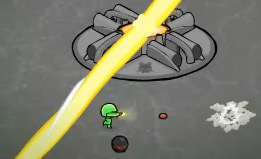
I recently made a game for a client that involved a giant sweeping laser of doom (the game had the laser, not the client). Sounds cool, right? Not if the laser happened to touch you while you were busy blowing up robots. Sound even cooler now that you know there were robots? It was. But that’s not what I want to talk about today. What I’d like to cover is the slightly more exciting topic of how to calculate the distance between a point and a line.

I won’t go into the math behind it, not because it’s complicated but because it’s just not that interesting or important to understand. I’ll just give you the code and then talk a little bit about why it might be useful in a game. If you really want to know how the math works, leave a comment or email me and I’ll do a follow up. For now, here’s a simple visualization (download source here):

This movie requires Flash Player 9

Once again I’ve built on a handy function written by Keith Hair that finds the point of intersection between two lines. Using his lineIntersectLine() function and my getDistanceFromLine() function you can calculate the distance between a point and a line very easily.

Why is this useful? I wrote it so that I could determine if the doom laser had overtaken my hero. Since the laser was represented in my code by two points (a line) and I knew the location of the hero (a point) all I had to do was calculate the hero’s proximity to that line. When the hero’s proximity was less than a certain distance >> kill hero. And because this calculation was done mathematically rather than being tied to a hitTestObject() based on the laser’s movieClip1, adjusting the laser’s killzone was as simple as changing one variable.

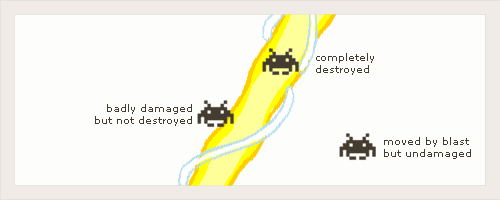
Here’s another example of how this information might be useful in a game. Suppose your game has a laser cannon which fires in a straight line, as opposed to the sweeping radar motion in my prior example. If you know each enemy’s proximity to the laser you can apply varying damage and effects to each enemy based on that information.

There are plenty of ways you could use this in a game, but I’ll leave that up to your creativity. You can download the source files for the above demo here. Oh and as is often the case with art in or around my site, the bad-ass laser and art in the screen grab above was done by my partner in crime, Ajay Karat of The Devil’s Garage. He and I are working on some games (not for clients) so expect to see some stuff from us in 2010.

  1. When designing your games you’ll want to keep your visual assets separate from your calculations. Let your calculations dictate what needs to be displayed, not the other way around. Tying calculations to visual assets is usually, if not always, inefficient and inflexible.
Olderposts Newerposts

Copyright © 2025 Bacon and Games

Theme by Anders NorenUp ↑