 I recently had a young programmer named Jack (that’s not his butt to the right) ask me for help with a game he’s been working on. I don’t want to give away too much about his unreleased game, but for the sake of discussion I have to at least tell you that it involves a big ass rock that goes around smashing the crap out of different shit. (and 2 sentences in I’ve hit my butt reference limit for this article)
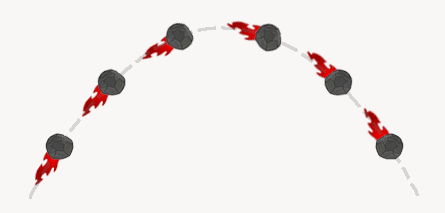
The version he shared with me was pretty far along but he was stuck on one particular detail; getting the rock’s tail to point in the proper direction. Essentially he wanted the tail to point away from the direction the rock was moving, similar to the tail a roll of toilet paper might draw when thrown through the air.
This is a fairly common challenge in game programming and I, like many other game programmers, have done this in the past. I have code that I would have happily handed over to him, but after speaking to him we decided it would be more valuable for me to push him in the right direction rather than just take his FLA and fill in the blanks. I’ll spare you the Chinese proverb about teaching a man to fish..
On Problem Solving
Whether you’re programming super complicated banking software or just making a simple number guessing game, the process is the same.
- What do you need to do? Define the challenge.
- What do you know? Assess the tools and info you have at your disposal.
- Do you have all the pieces? Figure out if what you have can be used to solve the problem.
- If yes: Create a plan for using what you have in order to solve the problem.
- If no: Break the problem into smaller challenges and return to step 1
This is of course a grotesquely generalized version of problem solving. But what’s important to note is that by asking the right questions you can distill ANY problem into simpler more manageable parts. No matter how complex, the solution to all programming challenges (and most real life ones too!) is simply the sum of smaller problems solved in the right order.
Asking the Right Questions
Let’s take a look at Jack’s problem and how we might break it down into a solution.

1. What do you need to do?
We need to rotate the rock so that it’s “facing” the direction it’s moving.
This is a “plain English” definition of the problem, which is the best place to start, but before we can continue we’ll need to convert the definition of our problem into something we can quantify.
Since movieClips have a rotation (_rotation in AS2) property, it’s likely that we’re going to need to use this to point the clip in the right direction. We know that the rotation property accepts degrees, so we’re probably looking for an angle.
The real answer to Question #1 is:
“We need to figure out the angle at which the rock is moving.”
2. What do you know?
In this step you’ll want to keep the answer to Question #1 in mind, but it’s perfectly fine to be liberal about listing the things you know. You can sort out the relevant data from the irrelevant later, but you never know what piece of information might spark an idea so to start it’s a good idea to list whatever comes to mind. (be creative!)

- Since the rock is a movieClip we have access to all of its properties; rotation, x, y, etc. These 3 are the most likely to be useful, but remember movieClips have all sorts of properties.
- It’s moving so we probably know its speed in the x and y directions
- Our rock might be in an environment with some rules, such as gravity, windspeed and friction. It’s our world, so we’d know all these things too.
- We also probably know who shot Mr. Burns. Who doesn’t? But I can’t imagine that’s going to do us any good.
3. Do you have all the pieces?
Now that we’ve listed the stuff we know, we have to sift through it for something that might help us calculate an angle.
If we can define a line, we can calculate an angle. Well, a line is defined by two points so let’s look at what we collected in Question #2 and see if we can come up with two points; two points that define the path of our rock.
We have the current location of the rock, via the x and y properties of the movieClip, which would be the end point of our line. We need the starting point to complete the line, which we don’t have in our list.
This means that the answer to Question #3 is “No”. We have to put this part of the problem on hold for now and refine our problem into a more specific question:
Where can we get the starting point so that we can draw a line?
Luckily for us this is an extremely simple problem. On every frame we’re going to be updating the position of the rock. So all we have to do is store the current position of the rock before we move to the next frame. (I recommend a variable called lastPosition)
If we do that, we can add lastPosition to the list of things we know, which gives us two points. We’ve got our line! This means we can calculate an angle, which means we can figure out what angle we need in order to point the rock in the right direction. We’re almost done!
The next thing we need to do is write a function into which we can pass our starting and ending points that will give us an angle in return. Since this isn’t a math lesson, it’s a lesson about learning to fish (OK I lied about the proverb), I’ll just write the function for you. They’re adapted from one of my favorite books, Keith Peters’ Foundation Actionscript 3.0 Animation: Making Things Move! (I’m also a big fan of this book
) Both are fantastic resources for math, physics and other common game programming stuff.
1 2 3 4 5 6 7 8 9 10 11 12 13 14 15 | // AS2 function getAngle(startX,startY,endX,endY):Number{ var dx:Number = endX - startX; var dy:Number = endY - startY; var radians:Number = Math.atan2(dy,dx); return radians*180/Math.PI; } // AS3 function getAngle(st:Point,end:Point):Number{ var dx:Number = end.x-st.x; var dy:Number = end.y-st.y; var radians:Number = Math.atan2(dy,dx); return radians*180/Math.PI; } |
 The last thing for us to consider is how to setup the rock clip. If we set it up so it’s facing to the right in its default position [rotation=0], the angle we get back from our function will point the rock in the correct direction.
There you have it, a seemingly complex problem broken down into a few manageable parts.
This problem was small, but the process is applicable to a project of any size and challenges of any complexity. The key is accurately defining the things you need to achieve. From there you can survey what you have at your disposal and see if what you have can be used to get what you need. If you can’t, you need to define more specific questions until you have all the tools and info you need to finish the job. It’s just that simple.
Now go, build the next Farmville or twitter or Google Wave, you know…something really useful. Oh, one more thing, bedonkedonk… I lied about the butt thing too ;)
Thanks to Ajay Karat for lending me his rock and fire art for the trajectory sample above.


 Hop on over to Cold Hard Flash to